Sunday, January 25, 2009

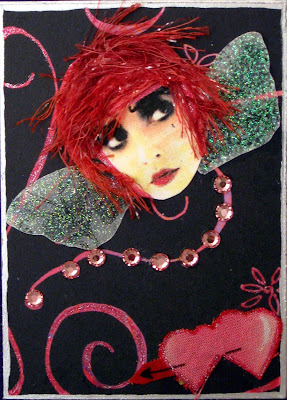
Paris Zetti

Here is the front of the page I'm sending in for the Zetti zine swap. I'll embellish it with some ribbon and a little bling here and there. The back page will be a composite of the Zetti valentines I made for an earlier swap. When both pages are complete, I'll post them.

I have to print out 13 of these pages and get to work on finishing touches front and back. Just a glimpse of what I'm working on today.

Stay tuned for more...

Saturday, January 24, 2009

Fat Pages Finale

Here are all of my fat pages, finally completed and adhered to their backing. I made a total of 122 (needed to enclose two extra). You can click on the photos to get a better view. This one was an overall shot of all them. Below I have posted a few of my favorite pages:


This was a big job, but I am definitely glad I pushed myself to do it. I now have a good grasp of this technique and plan to use it in a lot of my art. I will definitely use it in my collages that I am going to work on next.

The interesting thing will be seeing what I get in return. There will be 120 pages of different techniques mailed to me in the swap. I'll share some of those when I get them, probably sometime in March.

My goal today was to get these things finished, adhered to their backings and the directions posted on the back. I completed everything and they will go to the post office Monday. Stay tuned for the next project...


Tuesday, January 20, 2009

Vintage Themed Fabric Paper

I completed batch three of my fabric paper last night. I'm getting more on track, I think. I'm also running out of images! This first photo is a completed sheet that I used wallpaper as the paper scraps. The thicker wallpaper definitely takes the glue better than the thinner wrapping paper or other scraps I've used in earlier batches. You can click on the images to get a closer view of the detail.

On this next sheet I used some collage paper that I've had for years and was saving for...I don't know what. So, I adhered pieces of those papers and they did wrinkle a little, but that's to be expected.

Here is a closeup of the collage sheet.

If you notice on all of these sheets, compared to the earlier batches, there seems to be a gauzy type of cover over them. That's the tissue paper! I like the effect of a single sheet of tissue paper covering the whole thing. Now, I have to decide which sheets I'll use for the fat book pages and if I'll have to make any more. Then I'll cut them up into 4"x4" squares and adhere to the watercolor base page.

The only thing I wish were different is that these still seem a bit stiff for my liking. In the future, I will experiment with using some sheets with more diluted glue You are supposed to get a softer paper with more diluted glue. I will go back and check the article to make sure. I would like the fabric paper to be softer. But, I can live with what I have so far.

Also, I have some good plans for the sheets I've completed so far that won't be used for the fat pages. I'll use parts of them in my collages on the collage swap and other parts for a project about Paris. Stay tuned...

Monday, January 19, 2009

Tell Me I'm Dreaming...

Well, last night I had a big scare. I thought that I had been doing my fabric paper technique wrong! Ahhh!! Nightmare! But, after I started breathing again... I figured out it was OK after all. What I've done so far is technically correct. I am not completely happy with the results, but it's fine.

I was reading over an old issue of Somerset Studio and someone had used the technique in some pretty little hat boxes. But I noticed her fabric paper didn't look anything like mine! After reading further, I saw where her technique was different. In the last step, instead of just putting bits of tissue paper here and there, which I happen to like, she adhere a whole sheet over the entire page. Ahh...that is why her fabric paper had such a soft look. They had an entire sheet of tissue paper covering the images, almost like a see-through curtain.

So, today I tried it her way. Tomorrow when they are dry I'll see if there is a big difference. I know there will be because a couple of the sheets I did yesterday with the magazine pages didn't have any tissue paper at all (NOT really the correct technique), since I was thinking that was optional. Duh! So, after thinking about how to use those magazine page sheets, I figured I'll adhere them as a base for my collages, then paint over those or cover parts up however I want to.

After finishing the eight sheets I did today, I decided to make a little digital collage about dreaming. That's what too little sleep and a big project will do to you!

Sunday, January 18, 2009

"Paris" Pages

After learning the lessons from batch one, I am ready to start with batch two of my fat book sheets. I'm starting with a 12"x12" muslin square. These will be cut into 4"x4" squares when they are finished. So, here are my supplies all ready to go (learned this lesson the hard way; see previous post).

I went through all of the steps and produced 5 sheets that I liked better than the first batch. Here are my top three pages: This first one was my favorite of the five.

This one was my second favorite. I liked the colors and the composition of both of these:


This one was ok. I could have used less of the tissue paper and more of the images, but it will be fine for the fat book:


For today's batches I am using magazine images, which is what Beryl Taylor used in her technique. So far, I have only used wallpaper on my pages. The magazine papers will be thinner and probably easier to glue down. I have to make 16 sheets of this fabric paper, so I have a lot of room for experimenting with the different papers. I have to make enough sheets to be able to cut 125 4"x4" pages. So, off to do batch 3. Stay tuned...

Saturday, January 17, 2009

Sneak Peek

Here is a sneak peek at the first batch of my fat pages. I did a test run of two sheets that were approximately 14"x17", knowing I would have to cut them down to 4"x4" after they were finished. Not bad, but I did learn a few things that I will incorporate into the remaining batches. This shot is from the top of the sheet. The following photo is from an area I liked near the bottom of the sheet.

The process is very simple, yet a little time consuming. I learned about fabric paper in the magazine, "Cloth, Paper, Scissors". This technique was introduced by the artist Beryl Taylor. Her fabric paper was gorgeous!

You start with a piece of white or cream muslin, cut to the size you want, laid down on a piece of plastic (very important). You coat this with a glue/water mixture. Then, you add torn pieces of paper from magazines, wrapping paper, anything with images you like. As you add the paper into the glue/water mixture, you need to tap it down into the glue; make it part of the fabric. That is what I need to do a better job of in my next batches.

After you've placed all of your images where you want them, you coat the entire thing with another layer of glue/water. Then you add torn bits of tissue paper. You can stamp on it or not, but add it wherever you want to fill in some spaces. You can also leave a little bit of the fabric showing; it's up to you.

After you've adhered your tissue papers, you take some fluid acrylics or inks and paint over the whole thing. This helps unify all of the layers and gives a nice contrast. I watered down my fluid acrylics because they are very concentrated. Then you leave the whole thing to dry overnight. That is the most important. You have to wait until it is all dry.

The next day you simply peel the fabric paper off of the plastic. It will lift right off and then you have a sheet of cool fabric paper to use in your art! You can cut it up and use it in collages, you can sew on it (it is a fabric base), you can do whatever you like with it and it's your design! You picked the colors and the images. So, pretty cool, huh?

What I learned from the trial run:

1. Cut and tear your images up before you begin! I was frantically trying to rip and tear pieces of paper and place them into the glue. Duh! Have a stash ready. That way you can spend more time deciding where to place your images! Also, do the same with the tissue paper. Tear everything up before you begin. Right now I have bins of paper that I've prepared for the next run.

2. You really need to tap your paper down into the glue on the first step. I think some of my paper didn't get meshed with the fabric as much as I would have liked. Just bury the stuff in the glue.

3. The thinner you make your glue/water mixture, the smoother your fabric paper will turn out. If you would like a thicker feel to your fabric paper, don't add as much water to the glue. I used Sobo glue (a huge tube) and probably not enough water for my liking.

4. Water down your paint to get a more glazed look. Some of my paint went on too think and obscured the images I wanted to bring out.

So with all of these little lessons learned, now I can start the "real" pages. They will be planned better and hopefully will have a more pleasing look to them. By the way, I used this really cool wallpaper border for my Paris images. I bought it a while back on sale, knowing it would come in handy for an art project! I love images of the Eiffel Tower and anything Paris-related. So that is what I'm using for these pieces.

I've cut 15 sheets of muslin at 12"x12". Starting with a smaller canvas for each sheet will help the process go a lot smoother I think. You only learn by jumping in and doing. These are OK, but not what I would send out. I will probably cut them up and incorporate them into ATC's or some other smaller projects.
Stay tuned for round two...

Tuesday, January 13, 2009

Skinny Book Pages Completed!!

Here are 24 of the 25 skinny book pages I completed today! What a job, but I'm glad I pushed myself to do it. I didn't put all 25 in there because the one extra would show more of the rug underneath the pages than I would like. To get a closeup of a page, see the earlier post from today.

I just wanted to look at them all in one group, so here they are. When I receive the packet with everyone's pages, I'll post those.

Lighthouse At Sunset

Here is one of the 25 pages I've been busy making for my skinny book swap. You can see they are time consuming! I used inks in the background on each page, then a white gel pen for the snow. Next, I adhered a lighthouse that I scanned from a Christmas card and sketched in. I added textured fiber medium mixed with titanium white liquid acrylic paint to get the "snow" effect on the lighthouse. Then, of course, my trusty glass bead gel medium for the snow on the ground. Finally, I sketched in part of a tree on the left hand side to give a little more contrast to the page. I topped it off with a big Swarovski crystal for the light at the top! If you click on the photo you'll get a larger version and can see the detail a lot better.

I thought I'd show you one of these pages when I finished one that would make a good photo. Now, I've got to add the final touches to about 22 more and get them ready to take to the post office tomorrow. Stay tuned...I'll try and get a shot of all of them in a group photo before I pack them up.

It's very cold and snowy here today. This is a perfect day to stay inside and work on these pages! Stay warm!!

Thursday, January 8, 2009

City Lights

This photo was taken by my sister, Sherry, on her recent trip to New York. I used it in one of my Magic Carpet Ride ATC's. I've tried 30 photos and this is the best I could do. I'm just not a photographer. The camera shakes and the photo is blurry. I'm trying, but not getting too far with it. Anyway, this is the best of the worst. It really does look better in person. (Usually the photo looks better than the original; not here.)

I didn't like any of the photos I took of the other two cards I made, so I'll spare you those. There is one that's going through a drying process and we'll see how it turns out. If the card turns out ok and the photo does, too, I'll post it tomorrow.

Now, I'm FREE of all ATC trades and can get to my skinny book pages. Finally!! Should have the rough draft finished by tomorrow. Stay tuned...

A Different Kind of Sunset

This is one of the Magic Carpet ATC's I made. The awesome photo was taken by my sister, Sherry. That little turkey thought to take a photo down inside a vase I had in my guest bathroom. Who would think to do that? I loved it when she showcased it on her blog. (See sidebar for "Picture My World" blog)

I decided to make a transparency of the photo, and put it over a copy of a sunrise that I printed off the web. It doesn't show up in the photo here, but you can see hints of pinks and blues through the transparency. Then I added the silhouette of the magic carpet rider and set him off sailing through the sunset; at least this version of a sunset.

Today feels more like a day where I'm going down in flames, rather than riding off into a sunset. Printer issues, deadlines upcoming, just normal aggravations that can S-L-O-W you down. That is something I don't need right now. But, if the printer can hold out for another week or so we have one on order. Cross your fingers for me. I have major deadlines for things I've promised people and I don't want a lousy printer holding me up! Anyway, stay tuned...

Tuesday, January 6, 2009

Radar Love

Here is the final Zetti Valentine ATC. I hate to see them go...No worries, though. I signed up for another Zetti swap in February. :)

The Buckeyes lost their game last night, literally in the last seconds!! It was a big disappointment, but at least they made it to another good bowl. Now, they have to WIN one!!

I double checked and the last day to mail my skinny book pages is Jan. 15. So, that means tomorrow I start painting. They are all Gesso'd and ready for decoration. I'll show you a finished page when it's ready. Now I have to pull out the supplies I'll need for this assembly-line project. I really need to clean out this art room. Maybe someday...

Who Let The Cat Out?

That darn cat! I hate when she gets loose like that. Thought I would throw a little silliness in with my Zetti Valentine ATC's. I know, I know, they're all silly. But that's what Zetti art is!! Anyway, I'm working on my LAST one now. Here's a hint: Radar Love. Stay tuned...


Monday, January 5, 2009

Pink Cadillac

This is another ATC I made for the Valentine's Zetti swap. Only two more to go!

Love Is In The Air

Here is the third ATC I made for the Valentine Zetti ATC swap. I was hoping to be farther along today with this swap, but life got in the way. I will have to work on the other two cards tonight while I watch the Ohio State Buckeyes in their bowl game. I'll be too nervous, anyway, to sit still through that game. Working on the cards and the skinny book pages will help keep me busy.

Stay tuned for further developments... GO BUCS!!!

Sunday, January 4, 2009

Zetti Cupid

This is the second Zetti Valentine that I made for a Zetti Valentine swap. I love her hair! ;)

Purrrfect Love

Here is the first Zetti Valentine for my latest ATC swap. I think this is my favorite Zetti stamp! It's just a face, but I love this stamp. There are so many ways to embellish it... I found this really cool Vintage cat fabric in a thrift store bag. I saw it and immediately thought it was perfect for a Zetti body! Then I clipped around the rosebuds from the fabric and glued those down. She is adorable, if I do say so myself!

I'm working my way through these last ATC's and getting ready for the skinny book. I decided my winter scene for the skinny book will have a frozen pond, some bare winter trees covered in ice and maybe a little something extra. Still working on the sketches. Stay tuned...

Saturday, January 3, 2009

Postage Stamp People


Here are the other two ATC's I made for the Used Postage Stamp People Swap. I'm still not very good with this camera! After about 20 takes of each photo, these are the best I could do. I can't for the life of me hold that camera still!

Anyway, another swap is completed and will go out in the mail Monday. Up next, Zetti Valentines and Magic Carpet Ride. I have no ideas about the Magic Carpet Ride. I think mine may end up being a little off the mark, but I'll give it a try.

I'm still trying to stick to my goal of getting all of the ATC swaps that I've signed up for finished by Monday and taken to the post office. I am in the process of cutting my watercolor paper to the 4" x 7" size needed for the skinny book pages I need to make. Last count, I need to make 20 pages. These all have to be originals. I'm going to Gesso them all in one sitting (probably tomorrow) on front and back so they will be primed and ready to decorate come Monday. The same scene has to be on every page. I have my stamps all ready and some new techniques to try. Stay tuned...

Friday, January 2, 2009

Ol' Blue Eyes

This is an ATC I made for a swap called, "Used Postage Stamp People". The idea is you start with a used postage stamp, give it a body and put it in a background. This was a challenge! The first challenge was finding stamps with heads. I have a bunch of Frank stamps, but I needed two more. I managed to find two more and will post those when I'm finished. This one was a lot of fun.

I had an old song book that I got at the thrift store awhile back. I thought it would be cool to find a love song, or words with love in the song, for Frank to sing. The background is from an ad I really liked in a magazine. I colored in the windows of the building to make them stand out a little more. And since he's Ol' Blue Eyes, I changed the color of the ad to Blue (it was red). Ha! Pretty fun!!

I've finished one of the remaining two people. I have a packet of famous women stamps I got a while back. I've never heard of her, but she was from a while back. The other person is Fanny Brice. So stay tuned...

Thursday, January 1, 2009

Winter Scene

This is another Christmas card (from Sharon!) that I decided to make into a little artwork. I added the glass beads texture gel to the bottom, sewed pearl seed beads onto the background and added a Swarovski crystal at the top. I really like the monochromatic tones of the scene. It reminds me of a peaceful winter day!

Hope you are enjoying your New Year! I was feeling extra ambitious and decided to post to the blog twice today!!

Happy New Year!

Happy New Year! 2009 has to be better than 2008; at least I hope so! Hubby and I made a nice steak dinner and watched the Bowl games on TV. We love college football and this week, in particular! There are Bowl games on everyday!! So, we rang in the new year safely and quietly.

This is the latest altered Christmas card I made. I added the glass bead texture gel to the bottom for the snow effect. Then, I covered the trees and the snowman in Diamond Glaze to a) glue them down and b) give them a "sticker" effect. I then beaded white seed beads onto the background. Very cool! This one I will send away for a trade.

Today I hope to finish up some various swaps I'm signed up for in January and then get down to creating my skinny book pages, my fat book pages and my collages. Hopefully I won't be enticed to sign up for any more swaps until I make major progress on these big projects.

I don't usually make New Year's resolutions. I just hope to do better in the following year. For this year, though, I do hope to finish these larger challenges and I look forward to growing in my art! I hope everyone had a safe New Year. I look forward to what this years brings!